NxCore Access
NxCore Application Table of Contents
Default Location: \Nanex\NxCoreAccess\
NxCore Access is a program that maintains a connection to the NxCore Feed Servers and is responsible for bringing the NxCore Feed into your computer.
It also can download historic NxCore Feed data (one or more days older) in the background. You can run it as an application or as a service.
NxCoreAccess is designed to be a robust real-time downloader. Its highest priority is to ensure the current tape downloads successfully.
To that end, it can and will delete other tape files to make sure enough space is available for the current tape. The archive function should not be
relied upon beyond the current week (approx. 5 days of historical tapes). We *STRONGLY* encourage all customers to use a robust backup solution for
archiving tape files. Repeated requests to the support team for missing files may incur charges.
The following should serve as a small guide on the primary components of NxCore Access.
The Main Application Window:
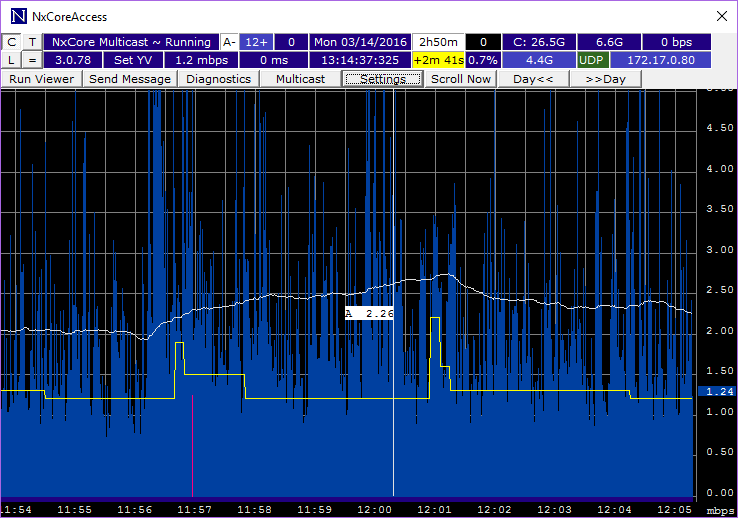
- Application Icon- Right-click to access a menu of different application settings.
- Chart Display - Shows the data flow for every second of time.
- Tape Display - Displays a tabular view of the tape display
- Log Display- Displays the date, time, and category of an event with a description of the event.
- Compact View- Reduces the window so it does not display the chart.
- Real Time Connection Status- Double-click to login to your account
- Connection Grade- Connection given by server. A= Excellent ... F= Bad. Please contact Nanex's Support team at support@nanex.net. Also displays rank compared to other connections. 0= Best, 100= worst
- Server Ping Time- Diaplayed in milliseconds. Round trip packet time between the Multicast Server and the remote NxCore Server. Color progresses to lighter blue every 10ms. The change from the last displayed value is shown with a '+' or '-'
- Server UDP Packet Loss (per 1,000 packets)- Applies to the connection between the Multicast Server and the remote NxCore Server. Color progresses to Red for higher values. A '~' used to differentiate from nearby cells
- Active NxCore Tape Date- Displayed in Eastern Time. Black = Market Holiday. Blue = Prime Time. White - Not Prime Time
- Uptime- Displays the length of time since NxCore Access started. Color progresses from red to dark blue as time increases.
- Thread Count- Count of the number of threads using NxCoreAPI.dll
- Active Disk and Free Space Red = You must increase free space ASAP, Yellow = Low, but enough space for today, Blue = Darker shades used with higher free space
- History Tape Size to download- Cumulative size of History Tapes not yet downloaded. Double click to configure settings
- History Download Bandwidth- Yellow coloring during prime time. During Prime Time, History download is enabled (recommend disabling). Non-Prime Time, History download is disabled (recommend enabling). Double-click to configure settings
|
- Version- The version of NxCore Access that is running formatted to reflect: major.minor.build. Yellow indicates a new version is available.
- Permission Set- Red reflects that your subscription will expire soon.
- Receive Bandwidth- Reflects the total inbound bandwidth during the last second.
- Time Difference- Average time difference between the adjusted system clock and NxCore Clock messages as they are read in the NxCore tape.
- NxCore Clock
- System Clock drift from True Time in milliseconds
- CPU Usage- Shows the total percent of CPU used by NxCoreAccess
- Actual Tape Size
- Server Connection Status
- Multicast Server IP- The IP Address of the Multicast Server that this machine is connected to.
- Run Viewer- Starts the NxCore API Viewer application
- Send Message- Allows you to send a message to Nanex’s Support Team.
- Diagnostics- Opens a menu of diagnostic tools
- Multicast- Click to configure settings
- Settings- Changes depending on which mode you are in. You can manage how the main application chart is displayed.
- Scroll Now- Used to jump to the real time date and time
- Day<<- Used to scroll the main application chart one day back
- >>Day- Used to scroll the chart one day forward in time
|
|
Account Settings:

|
- Account Name
- Password
- Account #
- Automatic Login- Check box to save account infomation to your computer
- Set- Click once you have entered your account credentials
- Cancel- Click to close Account Settings window without logging in
- Connect as Multicast Client- Optionally connect to Local NxCore Multicast
|
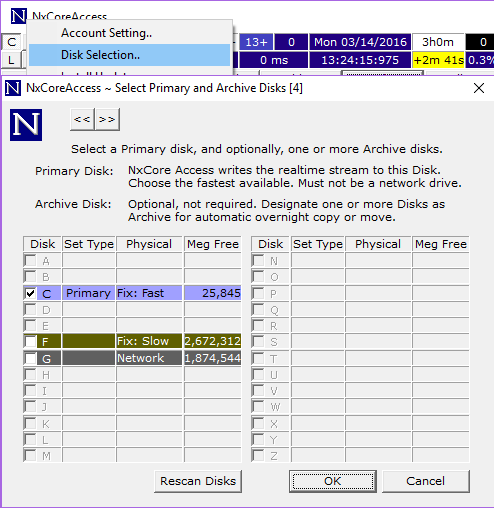
Disk Selection:
|
Select Primary and Archive Disks, Settings Screen 4:
- << >> buttons - Click to navigate backwards and forwards between Settings Screens.
- Disk - Check the drive(s) on which to save NxCore Tapes. While drive letter can differ, tapes will always be saved in the NxCoreData directory.
- Set Type - Left click directly on the cell displaying Primary or Archive to switch the setting.
- Primary Disk: NxCore Access writes the realtime stream to disk as a tape file. Choose the fastest available. Must not be a network drive.
- Archive Disk: Optionally designate one or more Disks as Archive for automatic overnight copy or move.
Archive is intended as a short-term convenience.
Since NxCore Access's primary objective is to receive the most recent tape,
it can and will delete historic tapes if they are stored on a drive it can access.
Therefore you MUST implement a process for backing up tapes outside of NxCore Access to avoid replacement fees if you require those tapes in the future.
- Physical - NxCore Access detects drives and categorizes them as fast or slow. It will write first to fast disks before writing to slow disks.
- Meg Free - Displays free disk space in megabytes.
- Rescan Disks - Click this button if you wish NxCore Access to rescan disks.
- OK - Click button to save settings and exit Setting Screen 4.
- Cancel - Click button to exit Setting Screen 4 without saving any changes.
|
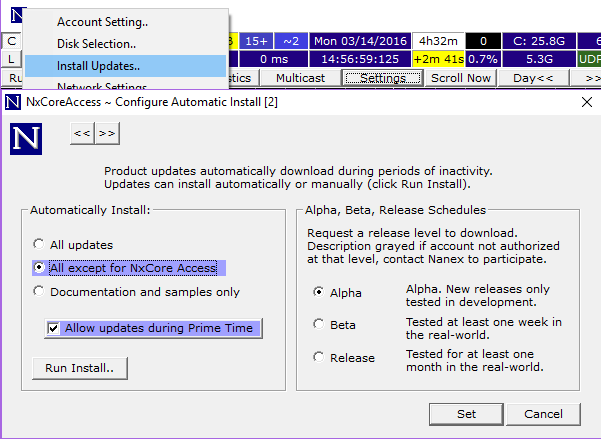
Install Updates:
|
|
Configure Automatic Install, Settings Screen 2:
- << >> buttons - Click to navigate backwards and forwards between Settings Screens.
- Automatically Install - Select one option to automatically install.
- All Updates Every update to NxCore
- All except for NxCore Access Updates to DLLs and applications other than NxCore Access.
- Documentation and samples only Only documentation and sample apps, but not NxCore API, Access or any other applications
- Allow updates during Prime Time - Check to enable updates during Prime Time, which is approximately 08:00-17:00 Eastern US Time.
- Run Install - Press button to manually run the selected install.
- Alpha, Beta, Release Schedules - Set a release level to download.
- Alpha Tested only in development
- Beta Tested a minimum of one week in the real world
- Release Tested a minimum of one month in the real world. Stable.
- Set - Click button to save settings and exit Setting Screen 2.
- Cancel - Click button to exit Setting Screen 2 without saving any changes.
|
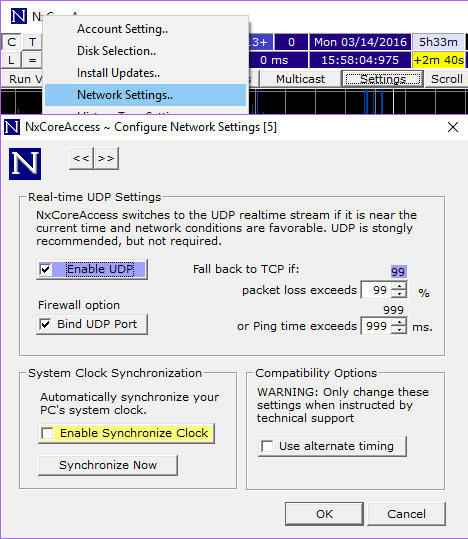
Network Settings:
|
Configure Network Settings, Settings Screen 5:
- << >> buttons - Click to navigate backwards and forwards between Settings Screens.
- Real-time UDP Settings - NxCore Access is UDP if it is near the current time and network conditions are favorable. Behind real-time, it will switch to TCP and then back to UDP when the stream catches up to real-time again.
- Enable UDP Check to enable UDP. Highly recommended.
- Bind UDP PortAllow the UDP port 55555, which NxCore uses.
- Fall back to TCP - Enter numerical values for packet loss percentage and ping time thresholds at which NxCore should switch to UDP.
- System Clock Synchronozation
- Enable Synchronize Clock Check to allow NxCore to synchronize system clock.
- Synchronize Now Press button to immediately synchronize system clock
- Compatibility Options
- Use alternate timing Only check this when instructed to do so by NxCore technical support.
- OK - Click button to save settings and exit Setting Screen 5.
- Cancel - Click button to exit Setting Screen 5 without saving any changes.
|
History Tape Settings:
|
|
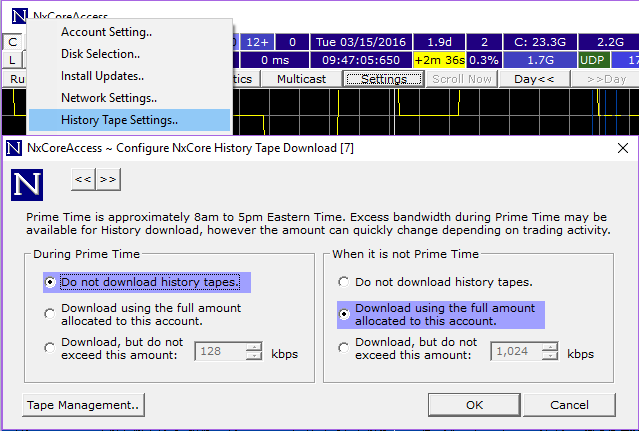
Configure NxCore History Tape Download, Settings Screen 7:
- << >> buttons - Click to navigate backwards and forwards between Settings Screens.
- During Prime Time
- Do not download history tapes - Select to allocate all bandwidth to real-time feed during Prime Time. Recommended setting.
- Download using the full amount allocated to this account - Select to allow download of historic data during Prime Time. Note that download of historic data is capped by account during Prime Time.
- Download, but do not exceed this amount - Select to download during Prime Time, but without exceeding the bandwidth you enter in kilobits per second.
- When it is not Prime Time
- Do not download history tapes - Select to download history tapes only during Prime Time.
- Download using the full amount allocated to this account - Select to download historic tapes the maximum speed allowed for your account outside of Prime Time. Recommended setting.
- Download but, do not exceed this amount - Select to download outside of Prime Time, but without exceeding the speed you set in kilobits per second.
- Tape Management - Press button to open Configure NxCore History Tape Maintenance, Settings Screen 8. Note that clicking the Tape Download button will return you to Settings Screen 7, Configure NxCore History Tape Download.
- OK - Click button to save settings and exit Setting Screen 7.
- Cancel - Click button to exit Setting Screen 7 without saving any changes.
|
View Permissions:
|
|
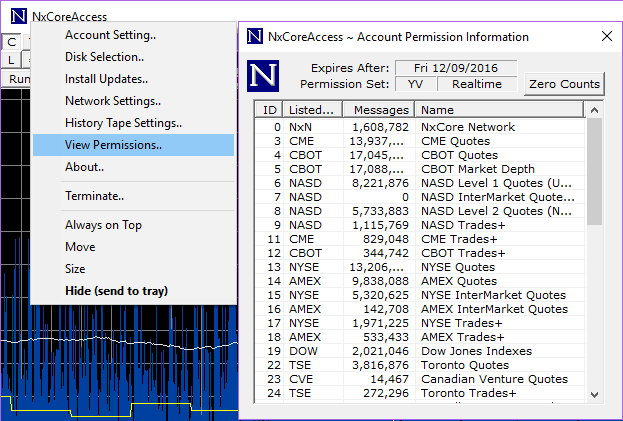
Account Permission Information: provides information about your account
- Expires After - Date of account expiration
- Permission Set - Displays tapeset and type of account (Realtime, Historic).
- Zero Counts - Click button to clear messages column and restart from zero. Useful to see if you're receiving messages for a particular permission set.
- ID - The Permission ID
- Listed - Listed exchange for that permission set.
- Messages - Number of messages per permission. Can be reset by clicking the Zero Counts button.
- Name - Permission set name.
|
About:

|
- About - Display information about NxCore Access, including version, build date, copyright, contact and author.
- Close - Press button to Close pop-up.
|
Terminate:
|
|
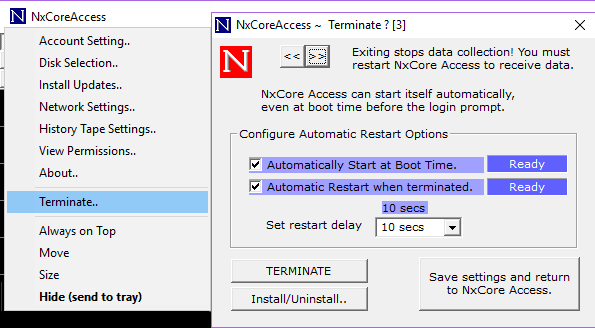
Terminate? , Settings Screen 3:
- << >> buttons - Click to navigate backwards and forwards between Settings Screens.
- Automatically Start at Boot Time - Check to start NxCore Access automatically when this computer reboots.
- Automatic Restart when terminated - Check to restart NxCore Access when NxCore Access is terminated.
- Set restart delay - Select time delay from 0 seconds to 48 hours between when NxCore Access is terminated and when it restarts.
- TERMINATE - Press button to kill the NxCore Access application.
- Install/Uninstall - Click button to pop up NxCore Installer. Note that you can use either the X or the Close button to exit this window.
- Save settings and return to NxCore Access - Press button to save any changes and close Settings Screen 3.
|
Diagnostics:
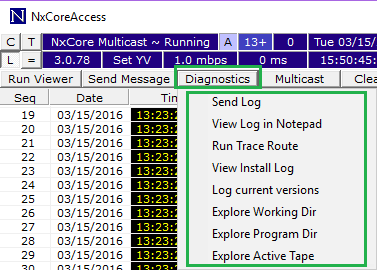
- Send Log - Allow NxCore support staff to view a copy of your log, which you can view locally clicking the L in the upper left-hand corner of NxCore Access's GUI to get to the Log View.
- View Log in Notepad - Opens your local NxCore Access log using notepad, which you can also view in the NxCore Access GUI by clicking the L in the upper left-hand corner to get to the Log View.
- View Install Log - Click to open a text version of your install log. Uses notepad by default.
- Log current versions - Adds information about NxCore application versions you're currently running to your Log, which you can view by pressing the L in the upper left-hand corner in the NxCore Access GUI. Useful if you need to inform NxCore Tech Support which version of NxInstall, NxCoreAPI or NxCoreAPIViewer you are currently using.
- Explore Working Dir - Opens the current working directory, by default C:\ProgramData\Nanex\NxCoreAccess
- Explore Program Dir - Opens the directory containing NxCoreAccess.exe, by default C:\ProgramFiles(x86)\Nanex\NxCoreAccess
- Explore Active Tape - Opens the directory containing the current tape file, by default C:\NxCoreData
|
- Run Trace Route - Open the Trace Path utility:
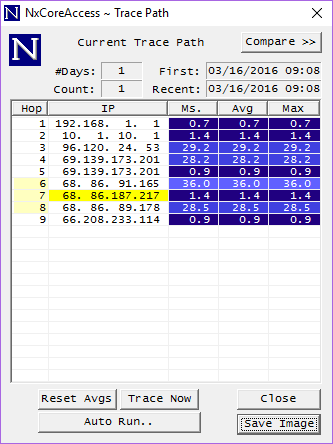
- Compare >> - Pops out another Trace Path for comparison.
- Reset Avgs - Removes existing averages so that your next run starts fresh.
- Trace Now - Perform trace route immediately.
- Auto Run.. - Run trace routes automatically over 5 minutes or 24 hours at one-minute intervals. Disabled by default.
- Close - Exit Trace Path.
- Save Image - Saves a local copy of the current Trace Path. By default: C:\ProgramData\Nanex\NxCoreAccess\YYYYMMDD.HHMMSS.bmp. There is also the option to send a copy to NxCore Tech Support, so click Yes if you'd like to, and No if you only want a local copy.
|
Multicast:
|
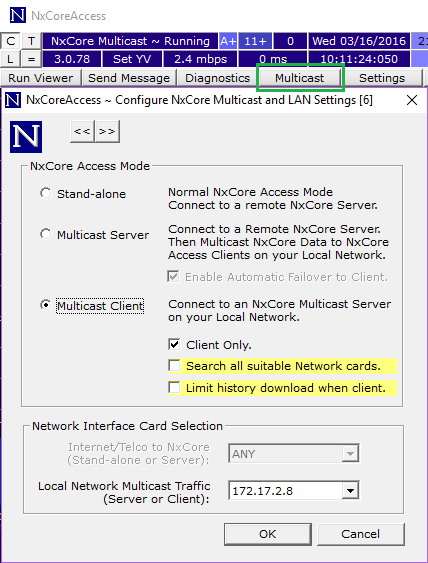
Configure Multicast and LAN Settings, Settings Screen 6:
- << >> buttons - Click to navigate backwards and forwards between Settings Screens.
- Stand-alone - Access data by connecting to a remote NxCore Server.
- Multicast Server - Connect to a remote NxCore Access Server, and multicast NxCore data to Multicast Client(s).
- Enable Automatic Failover to Client - Check if you'd like to allow another computer to become the Multicast Server, and for this one to become a Multicast Client.
- Multicast Client - This default selection connects to a local Multicast Server to receive NxCore data. Each Multicast Client will receive an identical local copy of the current tape as it is streamed by the Multicast Server.
- Client Only - Check if you'd like this computer to be only a Multicast Client. Selected by default.
- Search all suitable Network Cards - Find a Multicast Server if one is not detected on the current network card.
- Limit history download when client - Check to limit download of historic tapes when a Multicast Client.
- Internet/Telco to NxCore - Available when "Stand-alone" or "Multicast Server" is selected. Click to choose which remote NxCore Server to connect to or ANY (recommended setting).
- Local Network Multicast Traffic - Available when "Multicast Server" or "Multicast Client" is selected. For machines with multiple network interfaces, allows you to select which interface to use for multicast.
- OK - Click button to save settings and exit Settings Screen 6.
- Cancel - Click button to exit Settings Screen 6 without saving any changes.
|
Settings: - For settings screens two through seven, see above.
|
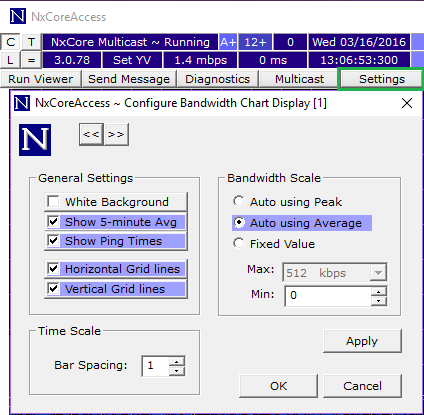
Configure Bandwidth Chart Display, Settings Screen 1
White Background - Check for chart background to be white rather than the default black.
Show 5-minute Avg - Check to display the 5-minute average bandwidth. Selected by default.
Show Ping Times - Check to show ping times in Chart, selected by default.
Horizontal Grid Lines - Check to display horizontal grid lines in the Chart, selected by default.
Vertical Grid Lines - Check to display vertical grid lines in the Chart, selected by default.
Auto using Peak - Automatically determine Chart scale based on Peak bandwidth.
Auto using Average - Determine Chart scale based on Average bandwidth. Selected by default.
Fixed Value - Set a fixed minumum and maximum for the Chart bandwidth scale by selecting a Max and Min from the provided fields.
Bar Spacing - Type in or use the arrow buttons next to the field to set spacing of each bar. The higher the number, the farther apart the bars. Set to 1 by default.
Apply - Click Apply button to apply any changes you've made to Settings Screen 1 while keeping Settings Screen 1 open.
OK - Apply any changes you've made, and close Settings Screen 1.
Cancel - Close Settings Screen 1 without saving any of the changes made.
|
|
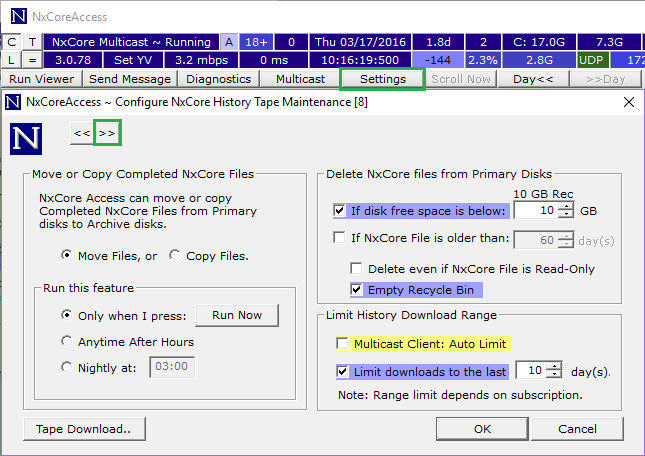
Configure NxCore History Tape Maintenance, Settings Screen 8:
- << >> buttons - Click to navigate backwards and forwards between Settings Screens.
- Move or Copy Completed NxCore Files - Configure what action(s) to take with a completed tape file.
- NxCore Access can move or copy... - Choose whether you would like the files to be copied or moved.
- Run this feature - Choose when the above copy or move should take place.
- Delete NxCore files from Primary Disks - Choose when NxCoreAccess will automatically delete tape files (starting with the oldest).
- If disk free... - Enable to have NxCoreAccess start deleting tape files when free disk space reach the number of gigabytes (GB) selected.
- If NxCore File is older... - Enable to have NxCoreAccess start deleting tape files when said files reach the specified age (in days).
- Delete even... - Check to have NxCoreAccess ignore the read-only flag and delete read-only files.
- Empty Recycle Bin - Check to have NxCoreAccess automatically empty the recycle bin after deleting files.
- History Download Range - Select how many historical tape files to download, if available on your subscription.
- Multicast Client.. - Check to have NxCoreAccess respect the limit set by the multicast server. Only relevant when connected as a multicast client.
- Limit download... - Check to have NxCoreAccess attempt to download the specified number of days of historical files. Subscription dependent.
- OK - Click button to save settings and exit Settings Screen 8.
- Cancel - Click button to exit Settings Screen 8 without saving any changes.
|
Copyright Nanex, LLC and Eric Scott Hunsader, 2003-
©. All rights reserved.
|


